Thursday, July 6, 2023

Papier Mâché Mini Pumpkins

Let’s create some Papier Mâché Mini Pumpkins!

I find these to be fun and relaxing to make.  They do take time to completely dry and that’s why I make several at a time.  I also need to rinse my hands in between applications.  There are many possibilities to explore as you go through the creative process.  Let’s begin.


SUPPLIE8

• Liquid Starch
• Paper Napkins
• Newspaper
• Masking Tape

Please Note:  Liquid Starch can be purchased at Walmart or online.


Crumple newspaper pieces to create a ball in the palm of your hand.  Dampen with liquid starch and press together.  Add a piece of newspaper over the ball and twist the top. Secure the top with a piece of masking tape. Dampen the ball with liquid starch.  Allow to
dry.


Create Wedges:  Crumple some paper napkin pieces and press into wedge shapes.  Dampen with liquid starch.  Apply to the ball by pressing into place a few
 at a time.  Cover with paper napkin pieces to secure into place.  Do this all the way around the ball shape.
 Allow to dry.

(Dry overnight, under/in front of a fan or by direct sunlight.)


Note:  Make sure that you also cover the stem completely.

These are the basics.  Create them in different shapes and sizes.  (You can also use papier mâché pulp to create wedges as in the gray pumpkin below.)


 I hope that you will give these a try.  Leave them plain or color them however you like.

Thursday, March 15, 2018

Papier Mâché Bunny Head Part I

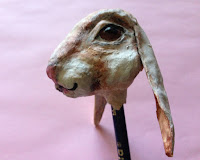
Spring is in the air and some bunny's in the enchanted forest. This little hare peeks out through the leaves with its big eyes and floppy ears.  It's hard to just make one.  I hope this project will inspire several whimsical creations for your home or indoor fairy garden.  Enjoy!

This bunny project uses paper napkins and recycled paper mixed with liquid starch.  I also used a skewer to support the head.  It can be a pen/pencil topper or an art doll head.
•••
Note:  Dampen the paper frequently with liquid starch as you press together.
•••

1.  Crumple ordinary paper & cover with paper napkin.

2.  Add liquid starch a little at a time and hand/finger press the paper into an egg shape.

3.  Press more pieces of crumpled napkin to shape forehead, nose & cheeks.

4.  Allow to dry.


Press to create indentations for eyes and continue to shape towards the nose.  Add more paper napkin pieces to build up the nose and cheeks.


This will continue throughout the entire piece.  Allow to dry in between stages.  When it is tacky enough, insert a skewer or pencil. Add more napkin pieces to hold it in place.  Dampen & press around skewer.  Allow to completely dry so that it can be handled better.


PLEASE READ PAPIER MÂCHÉ BUNNY HEAD PART II FOR THE REST OF THIS PROJECT.  THANK YOU.


Wednesday, March 14, 2018

Papier Mâché Bunny Head Part II

Welcome to the continuation of making a cute bunny head.  Let's now work on the rest of the features.

•••
1.  Use a pen or pencil to draw on each side of the head.  Roughly outline where your eyes, nose, mouth and cheeks will be.

2.  (Eyes) Roll two little balls out of paper napkin pieces and liquid starch.  Allow to dry.

3.  Create sockets for eye balls by pressing down under the forehead.  Do this on both sides.

4.  Insert the eye balls.  Cover them with little strips of paper dampened with liquid starch.  Allow to dry.  Now continue to cover the entire surface of the face in the same way.  This holds everything in place.

5.  Re-trace outlines of the features.


6.  Make two ears.  Cut them out or tear them and twist into shape.  Attach them with dampened paper strips dipped into the liquid starch.

  
7.  Look at all sides to make sure the features are in the same places.  Add enough paper napkin pieces to make it more rounded.

8.  If it looks even, cover with another layer of Papier Mâché strips over the entire surface.  I used cream colored copier paper strips.  Now it is ready to paint.


9.  Begin to add paint.  I used acrylic craft paint.


Note that I removed the skewer and added a pencil to give the head more support.  A smoother surface made it easier for me to begin painting as shown here.  This is the other side of the bunny face.  I tried a few different color schemes before deciding on a final look.  Try to get both sides of the face to blend even though they may not be identical.

Here we are!  I will stop at this point and give my little bunny a name.  I welcome your comments below. Thanks for stopping by and have a Hoppy Easter!


Sunday, June 11, 2017

Papier Mache Pulp Dough Part II (Goblin Face)

Here's a follow-up on my Papier Mache Pulp Dough face.  The shapes begin to come together and transform into a character.  If you have not made pulp dough before, please refer to Part I to see how the process began.

I have coated the face with scraps of copier paper dipped into liquid starch.  This gives a neutral base to the face.  Once dry, the features are added on to give it character.

Added neutral colored paper pieces to cover this face.
Wet from liquid starched paper pieces.
Added small piece to nose.
Here is the added nose piece.
A piece for the chin.
Added chin piece here.

Dried Goblin Face blank.

Outlined facial features in pencil.

Tuesday, May 30, 2017

Papier Mache Pulp Dough Part I


I would like to share my process for making a clay-like papier mache pulp modeling dough.
••••••••••••••••••••••••••••••••••••••••••••••••••••••••••••
SUPPLIES:  Sta Flo Liquid Starch & Newspaper
••••••••••••••••••••••••••••••••••••••••••••••••••••••••••••
Simple Recipe:

1.  Tear pieces of newspaper or moisture absorbent paper.  (No glossy paper.)
2.  Soak overnight in container of hot water.  Boiled water speeds process but not necessary.
3.  Squeeze or strain the water from the paper.  The result will be pulp.
4.  Place the pulp into a container and cover completely with liquid starch.
5.  Mix and mash the saturated pulp with a fork until it sticks together.
6.  Knead and roll the sticky pulp into a ball until smooth on the surface.
7.  Repeat steps 4 -6 until all fibers are tacky enough to stick together.
8.  Test by smoothing the surface with a finger dab of liquid starch.  Draw a line over the surface of the dough with a toothpick or pointed tool and poke a hole into the dough.  These actions will leave impressions similar to pressing into clay. There should be no tearing.  If there are tears in the dough,  it is not wet enough.

USE THIS PROCESS TOGETHER WITH TORN PAPER PIECES.  USE TORN PAPER PIECES DIPPED INTO LIQUID STARCH OVER THE DOUGH TO CREATE A SMOOTHER SURFACE AREA.

Inquiries welcomed.  Hope you'll give this a try.  Please visit me on Facebook @WhimsyRoz.
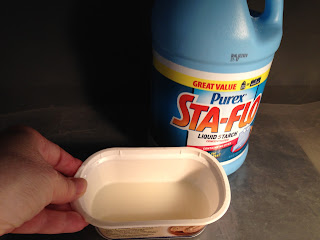
Sta Flo Liquid Starch in Bottle.
Fork is used to mash pulp and liquid starch together.
Fork should stick straight up.
A line and 2 poked holes.  The Smiley Face test.
                                       
READY, SET, SCULPT!  Put some shapes together and see what happens.
Adding wet paper pieces dipped in liquid starch.
Smoothing out the details.

Tuesday, June 3, 2014

Dragon Wing Whimsy Paper Mache Sculpture

Welcome to my brief tutorial on making paper mache dragon wings. Recently, I have experimented with wing shapes for my dragon sculpture.  Making dragon wings using this simple method has been lots of fun. There is minimal effort involved because I have been able to sculpt shapes easily without the use of a wire armature.

Wing making can be fun and whimsical.The sky is the limit for themes ranging from Fairies to Dragons! These same steps can apply to many projects.Though I have free- handed my wing sketch, you could trace any design.

I hope the following information will be helpful.  Please feel free to ask questions in the "Comment" section.

DRAGON  WINGS:

Supplies:

Paper, pen or pencil, scissors, Sta Flo liquid starch.
~~~~~~~~~~

I start with an original sketch on a piece of paper.  Cut it out.  Any type of newsprint, copier paper or even card stock will do.  These should be cut out in duplicate.  I am only showing one for demonstration purposes.


Process:

I apply one layer of paper strips that have been torn and  lightly dipped into liquid starch.  I continue to follow the outline of the wing by adding twisted paper strands as structural support at wing points and upper inside curve, as well as upper wing curve and tab (where it attaches).

The strands are covered using the paper strip process.  Repeat this process until the wing is entirely covered by one layer of these overlapping strips.


Further images and applications can be found at the following link:
https://www.etsy.com/listing/190254494

~~~~~~~~~~~~~
Note:  Repeat this process  with the other wing.  Allow to
dry. Paint in your choice of colors.


Fairy wings can similarly be constructed but with different design variations that are not as harsh.

Friday, January 31, 2014

Fairy Shape Sculpt WIP

Welcome to the continuing preparation of a lady figure.  Once the main shapes are connected, the detailing can vary. The forms can be pressed into smaller, thinner shapes.  Also, they can be trimmed or filled in, sculpted over, etc. It's up to your imagination to transform the shapes.

I've decided to give this lady a fairy look. The arms and torso are shaping up, as well as the hair.  Here's my work in progress.


Gradually, I've begun adding twisted strands of paper for the hair, as well as torn paper pieces to the skirt.  The torso takes shape gradually with pieces of pressed craft tissue paper.  The paper is dipped in liquid starch each step of the way.

Next, I'm adding wings to achieve a fairy look.  I have also continued to improve the torso and arms.


This work in progress will continue with layering of paper and other additions if necessary.  Please stay tuned and let me know if you will give this a try.