Thursday, March 15, 2018

Papier Mâché Bunny Head Part I

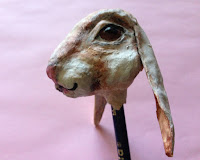
Spring is in the air and some bunny's in the enchanted forest. This little hare peeks out through the leaves with its big eyes and floppy ears.  It's hard to just make one.  I hope this project will inspire several whimsical creations for your home or indoor fairy garden.  Enjoy!

This bunny project uses paper napkins and recycled paper mixed with liquid starch.  I also used a skewer to support the head.  It can be a pen/pencil topper or an art doll head.
•••
Note:  Dampen the paper frequently with liquid starch as you press together.
•••

1.  Crumple ordinary paper & cover with paper napkin.

2.  Add liquid starch a little at a time and hand/finger press the paper into an egg shape.

3.  Press more pieces of crumpled napkin to shape forehead, nose & cheeks.

4.  Allow to dry.


Press to create indentations for eyes and continue to shape towards the nose.  Add more paper napkin pieces to build up the nose and cheeks.


This will continue throughout the entire piece.  Allow to dry in between stages.  When it is tacky enough, insert a skewer or pencil. Add more napkin pieces to hold it in place.  Dampen & press around skewer.  Allow to completely dry so that it can be handled better.


PLEASE READ PAPIER MÂCHÉ BUNNY HEAD PART II FOR THE REST OF THIS PROJECT.  THANK YOU.


Wednesday, March 14, 2018

Papier Mâché Bunny Head Part II

Welcome to the continuation of making a cute bunny head.  Let's now work on the rest of the features.

•••
1.  Use a pen or pencil to draw on each side of the head.  Roughly outline where your eyes, nose, mouth and cheeks will be.

2.  (Eyes) Roll two little balls out of paper napkin pieces and liquid starch.  Allow to dry.

3.  Create sockets for eye balls by pressing down under the forehead.  Do this on both sides.

4.  Insert the eye balls.  Cover them with little strips of paper dampened with liquid starch.  Allow to dry.  Now continue to cover the entire surface of the face in the same way.  This holds everything in place.

5.  Re-trace outlines of the features.


6.  Make two ears.  Cut them out or tear them and twist into shape.  Attach them with dampened paper strips dipped into the liquid starch.

  
7.  Look at all sides to make sure the features are in the same places.  Add enough paper napkin pieces to make it more rounded.

8.  If it looks even, cover with another layer of Papier Mâché strips over the entire surface.  I used cream colored copier paper strips.  Now it is ready to paint.


9.  Begin to add paint.  I used acrylic craft paint.


Note that I removed the skewer and added a pencil to give the head more support.  A smoother surface made it easier for me to begin painting as shown here.  This is the other side of the bunny face.  I tried a few different color schemes before deciding on a final look.  Try to get both sides of the face to blend even though they may not be identical.

Here we are!  I will stop at this point and give my little bunny a name.  I welcome your comments below. Thanks for stopping by and have a Hoppy Easter!